A skeleton for setting up your node js project
There are many reasons that you might want to run your application on node js as opposed to php. One reason that stands out for me is that node js has a built in server, making it much lighter than say php that typically served on top of either Apache or Nginx 'web servers'. This typically makes such applications very heavy on memory usage, with each thread maybe consuming around 128MB for a standard Drupal site. You can see why the like of Amazon have benefited by offering an auto scaling infrastructure that allows you to automagically spin up instances of servers in order to cope with say a spike in web traffic/memory usage.
It is also possible to run both Apache and Node JS concurrently. I am using the Plesk NodeJS extension that makes it super easy to run your node application as an entry point and still fall back to apache or nginx for other static html files and assets. This is probably sub-optimal for the reasons I have explained earlier but does make it easy for me to serve a mixture of both legacy static and node js code!
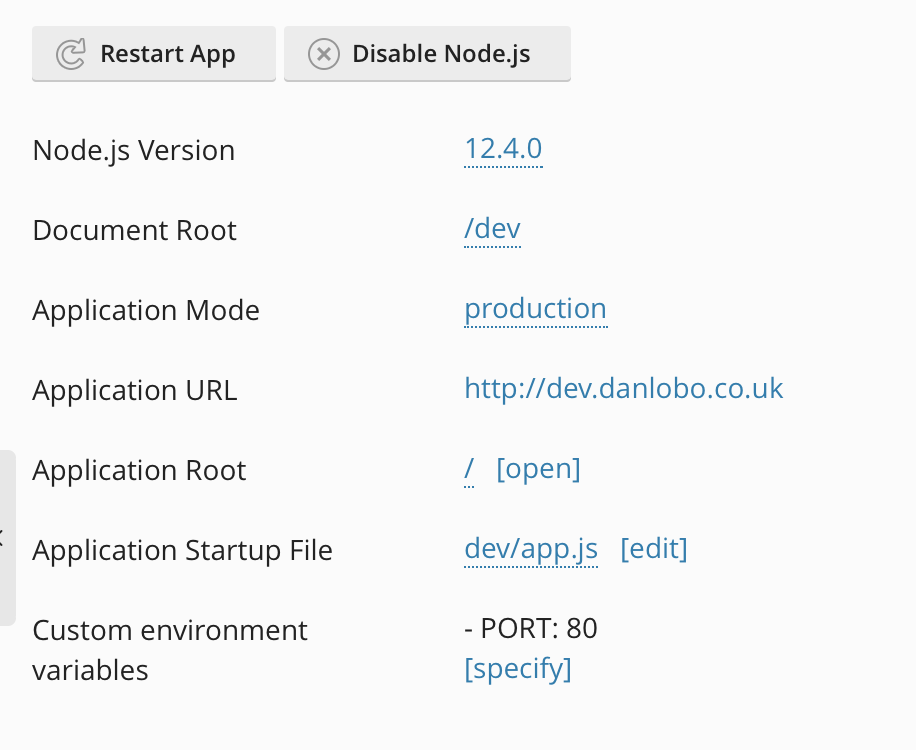
Here's a screenshot showing the CTA's and configuration options around node js. Here we can see node js running on port 80 in this case alongside Apache running as an FPM Modue.
For those without access to Plesk's Node JS Plugin and wants to run apache alongside node js etc, I believe there are other tools out there including Phusion Passenger originally developed for Ruby on Rail applications to run alongside Apache and Nginx etc that now works with Python and Node JS.
To this end I have created a basic skeleton that not only can be used to run your node js application locally, which is obviously useful for developing and debugging, but also allows you run fairly easily from the server with a couple of clicks in the control panel.
It is worth knowing that for your changes to take affect the node js application will need to be restarted.
Ok one thing you probably already know about node applications is that they are javascript. This means extra care must be taken to handle any sensitive data or configuration, and not unlike other app development languages, best practice recommends storing such info in a an environment file. Plesk it self also provides a nice ui to manage your environmental variables. However it is also a good starting point to consider how we will store our environmental variables. This will also be useful for automating the process of running out application locally.
npm i -D dotenvSo in our new project I am going to install the doting variable as a dev dependency. If not already created this will create an package.json file in your project with the following:
{
  "devDependencies": {
    "dotenv": "^8.2.0"
  }
}
Within node applications the convention is to use app.js as the entry point. This is a common for Single Page Apps. With this is mind we want to add the following to the scrips entry of the package.json
  "scripts": {
    "start": "node app.js",
    "dev": "node -r dotenv/config app.js"
  }
So your final package.json should look something like this:
{
  "devDependencies": {
    "dotenv": "^8.2.0"
  },
  "scripts": {
    "start": "node app.js",
    "dev": "node -r dotenv/config app.js"
  }
}
Here we are simply including the dev dependency and when running the following command
npm run devSo now we have the ability to load environmental variables. We simply need to set them by adding a .env file to the root of your project directory. e.g.
# .env ======
PORT=3000
This will come in useful when it comes to running our app, especially on a local environment where we want to be able to see out code running on a specific port to avoid say conflicts with other apps that may be running including Apache, Nginx etc.
So here is the code we want to run
const http = require('http');

http.createServer(function(request, response) {
response.writeHead(200, {'Content-Type': 'text/html'});

response.end("<h1>Hello World/h1>");
}).listen(process.env.PORT);

console.log('App is running...');
So here we are specifically requiring the node js's http module to handle the http requests and basically act as a server for our hello world application.
We are specifying the content/type for the http response header and also passing a payload, in this case the 'Hello World' sting enclosed in some basic html markup.
Notice also how we are accessing the environmental variable to determine the port number that the app should run on i.e. `process.enc.PORT`.
So that is it really. Plesk makes it super easy to run you node js application on a production environment. Something to be aware off is that because the codebase is acting as a webserver, the potential for security holes and the consequences can be graver here. With this in mind, not unlike other applications, the onus is on the app developers to make sure there apps are kept up to date and secure.
Add new comment